In a home theatre, the projection screen is the silent partner that transforms visual experiences. Whether indulging in a cinematic masterpiece, gaming with friends, or immersing yourself in the latest TV series, the right screen can elevate your viewing pleasure to new heights. This article serves as a guide for everyone looking for a home theatre projection screen and those who want to change their screen.
I. Introduction
The importance of choosing the right screen must be considered. At Lumina, we understand this significance, and that’s why we’re here to guide you through the process of making an informed choice.
Before we look into the nitty-gritty of selecting the perfect screen, let’s take a moment to understand why the screen is the linchpin of your home entertainment setup.
II. How to Choose the Right Size Screen
Imagine watching a movie on a screen that’s too small; the details get lost, and the experience falls flat. Conversely, an excessively large screen can strain your eyes and diminish the overall visual quality.
Consider the room dimensions and seating arrangement when determining the ideal screen size. It’s not just about fitting a screen into a space; it’s about creating an environment where every viewer can enjoy a clear and comfortable view. Here are some tips to guide you in this process:
- Viewing Distance Matters: The distance between your screen and the seating area plays a crucial role. As a rule of thumb, the ideal viewing distance is about 1.5 to 2.5 times the diagonal screen size.
- Room Dimensions: A smaller room might benefit from a moderate-sized screen to avoid overwhelming the space. Conversely, a larger room can accommodate a more expansive screen for a cinematic feel.
- Seating Arrangement: Consider the number of seats and their placement. Ensure that everyone in the room has an unobstructed view, creating a shared cinematic experience. With Lumina’s Leor UST projection screen, you have a viewing cone of nearly 180 degrees, so no matter where you are sitting, you get that same front-row feeling!
III. How to Choose the Right Type of Screen
- Different Screen Materials:
Screens come in various materials, each with unique characteristics. Understanding these materials is crucial for making an informed decision. Following are some of the types of screen materials-
- Matte White: This is one of the most popular and widely used screen materials. It provides a wide viewing angle and is ideal for environments with controlled lighting. Matte white screens are known for delivering accurate colour reproduction.
Satin Premium by Lumina Screens is a matte white screen that has a flexible PVC material and specialized coating to ensure crisp, flat, and picture-perfect projections for an immersive viewing experience.
- Acoustic Transparent Screens: These screens are designed to allow sound to pass through, making them suitable for setups where speakers are placed behind the screen. They maintain audio clarity while delivering a cinematic visual experience.
The Accupix series by Lumina Screens offers captivating visuals and crystal-clear audio. It delivers stunning colour neutrality for mesmerizing images that will captivate your eyes.
- Micro-Perforated Screens: Similar to acoustic transparent screens, micro-perforated screens have tiny holes that allow sound to pass through. They are commonly used in large venues, ensuring an immersive audio-visual experience.
- Ambient Light Rejecting (ALR) Screens: These screens are specifically designed to combat ambient light. They often feature specialized coatings or materials that absorb or reflect ambient light, ensuring that the image remains clear and vibrant even in well-lit environments.
- Consider Ambient Light Conditions:
If you’re going for a screen that doesn’t have ALR properties, then you must consider the lights filling in your room, be it natural or artificial. As it will make your image look dull and washed out.
Lumina’s Leor series, especially the newly launched Leor UST, has excellent ALR technology that rejects light from above and perpendicular to the screen. So whether it’s natural sunlight or artificial, our Leor screens are designed to minimize glare and reflections, preserving the integrity of your visuals.
Your choice of screen type significantly influences image quality. Lumina screens prioritize clarity, colour accuracy, and sharpness, delivering a visual feast that captivates and immerses.
IV. How to install a lumina screen
- Step-by-step guide for screen installation
- Necessary tools and equipment for installation
- Tips for achieving proper screen tension and positioning for optimal image quality
A. Step-by-step guide for screen installation
Step 1: Choose the Right Location
Select a wall that provides a clear line of sight from your seating area. Consider factors like room lighting, seating arrangement, and the distance from the projector to the screen.
Step 2: Measure and Mark
Measure the dimensions of your projection screen and use a level and pencil to mark the intended location on the wall. Ensure that the markings are straight and aligned with your seating area.
Step 3: Prepare the Wall
Clean the wall surface to ensure proper adhesion. If you’re installing drywall, use a stud finder to locate and mark the position of wall studs. This is crucial for secure mounting.
Step 4: Mounting Brackets
Attach the mounting brackets to the wall using screws and wall anchors. Ensure that the brackets are level and properly aligned with your markings. If you’re attaching to wall studs, use appropriate screws for a secure fit.
Step 5: Assemble the Screen Frame
Follow the manufacturer’s instructions to assemble the screen frame. This typically involves connecting the frame pieces and securing them with the provided hardware. Make sure the frame is stable and free from defects.
Step 6: Attach Screen Material
Carefully attach the screen material to the frame according to the manufacturer’s guidelines. This may involve snapping the material into place or using provided clips or tensioning systems. Be cautious to avoid any wrinkles or folds in the material.
Step 7: Hang the Screen
Once the frame is assembled and the screen material is attached, hang the screen on the mounting brackets. Most screens come with hooks or brackets that easily slide onto the wall-mounted brackets.
Step 8: Adjust and Secure
Adjust the screen height and alignment to ensure it is centred and at the desired height for optimal viewing. Secure any locking mechanisms or additional brackets to prevent accidental dislodging.
Step 9: Connect to the Projector
Connect your projector to a suitable source, and ensure it’s positioned according to the manufacturer’s recommendations for optimal projection. Adjust the focus, keystone correction, and other settings for a clear image.
Step 10: Test and Enjoy
Power up your projector and test the screen with your chosen content. Make any necessary adjustments to achieve the desired image quality. Once satisfied, sit back and enjoy your home theatre experience.
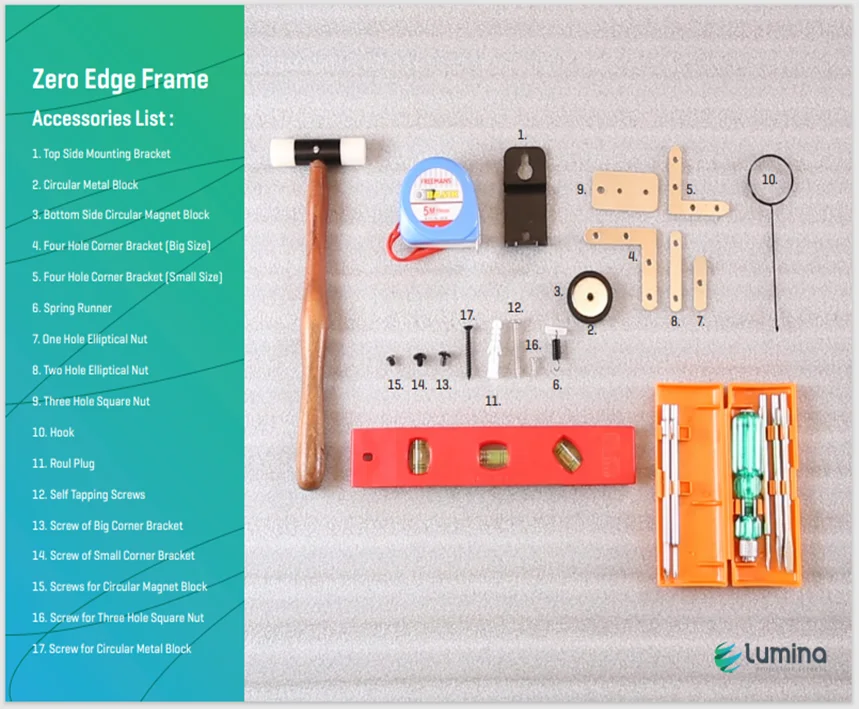
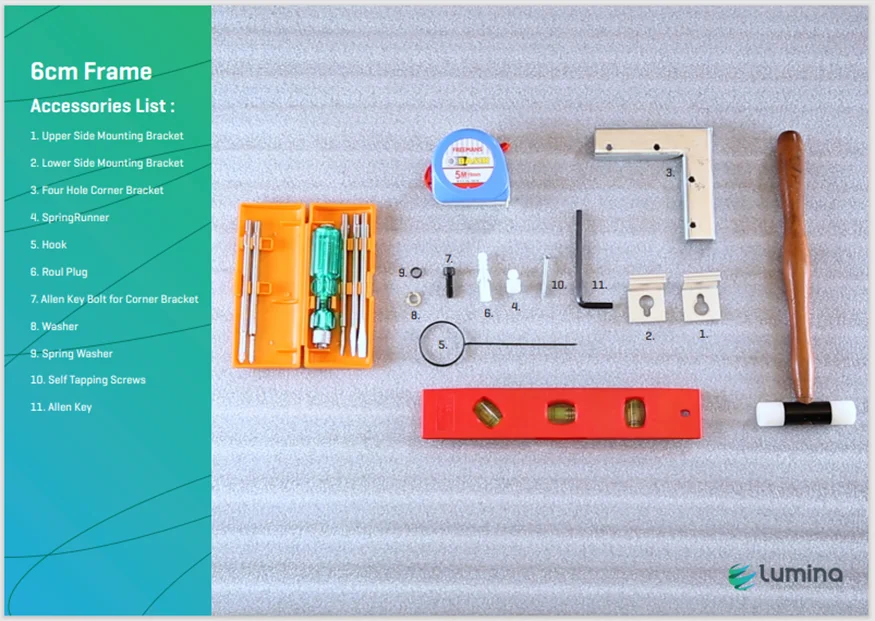
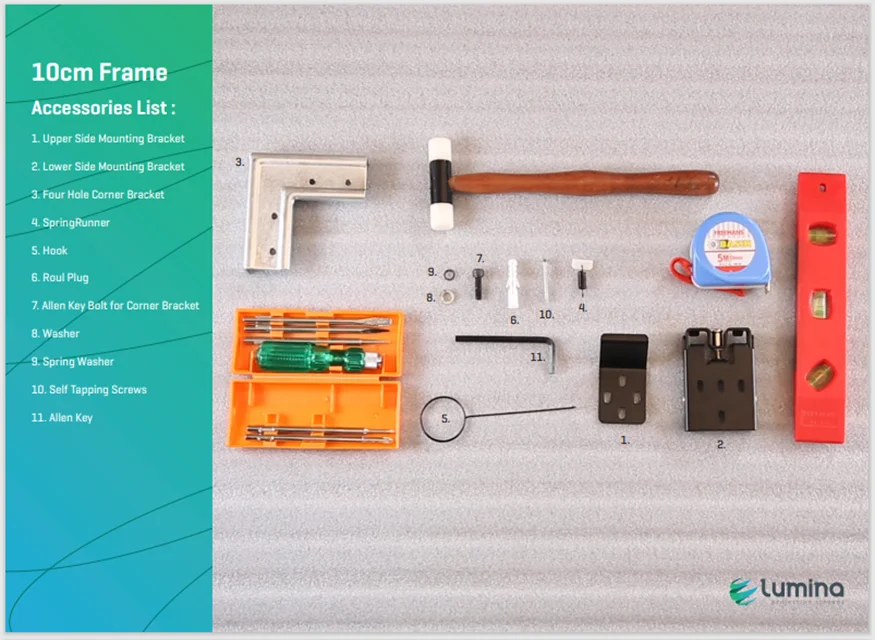
B. Necessary tools and equipment for installation
Screw Driver Set, Allen Key, Measuring Tape, Water Level, Nylon Hammer, Tensioning Hook etc.
C. Tips for achieving proper screen tension & positioning for optimal image quality
- Correct Right Projection Side Selection:
Choosing the correct projection side is always a key factor during screen installation; otherwise, the ultimate and optimal result will not be achieved.
- Screen Orientation:
Ensure that the fabric is placed on the frame during installation according to the instructions mentioned on the stickers. This ensures that the top side of the screen aligns with the top frame, and the bottom side matches the bottom frame. For clarity, top and bottom stickers are provided on both the fabric and frames, facilitating an easy match for the installer.
- Corner Fittings:
Initiate the installation of the fabric on frames from one corner to the diagonally opposite corner first. Completing all four corners initially ensures uniform installation on all sides. Subsequently, work on opposite sides in pairs, aiding in consistent screen attachment to the frame.
- Correct & Quality Runners/Hooks Use:
It is essential to use new, correct, and well-fitting runners and hooks during the screen installation. The use of loose or incorrect items can spoil the alignment.
- Visual Inspection & Adjustments:
If any alignment issues or shrinkage become apparent, adjustments should be made by repositioning the hooks or runners within the frame groove.
V. How to Take Care of Your Lumina Screen
- Conduct Regular Visual Inspections:
Regularly monitor and visually inspect your Lumina screen for any signs of damage or issues.
- Use Hand Gloves and Minimize Touching:
When checking or handling the screen, use hand gloves to avoid direct contact. It’s advisable to minimize touching the screen whenever possible.
- Perform Vertical Dusting:
Regularly dust the screen vertically using a dry, soft, lint-free microfiber cloth to maintain its cleanliness.
- Check Auditorium Ventilation:
Ensure that the ventilation process in the auditorium is functioning properly to maintain optimal conditions for the screen.
- Maintain a Safe Distance from the air conditioning system:
Keep the air conditioning system at a safe distance from the screen to prevent any potential damage.
- Keep Food and Children Away:
Avoid placing food near the screen, and ensure that children are kept away to prevent accidental damage.
- Avoid Harsh Cleaning Agents:
Do not use any hard cleaning agents, acids, or chemicals on the screen, as these can damage the surface.
- Keep Sharp Objects Away:
Ensure that sharp objects are kept away from the screen area to prevent scratches or punctures.
- Follow Cleaning Guidelines:
Adhere to the recommended cleaning method provided at https://luminascreens.com/how-to-clean-your-home-theatre-projector-screen
- Contact OEM for Assistance:
If needed, contact the Original Equipment Manufacturer (OEM) for further assistance or guidance on maintenance.
How to Ensure Peak Performance for Your Lumina Screen:
- Regular Visual Inspections:
Consistently monitor and visually inspect your Lumina Screen to identify any potential issues promptly.
- Vertical Dusting Routine:
Perform regular vertical dusting using a dry, soft, lint-free microfiber cloth to maintain a clean screen surface.
- Check Screen Tension:
Monitor screen tension on the frame; if it’s loose, replace hooks or runners with new ones to ensure proper tension.
- Luminance Check:
If possible, use a luminance meter to check the luminance of the screen, ensuring optimal brightness.
- Projector Settings Adjustment:
Make adjustments in the projector settings if the colour reproduction process is not meeting expectations.
- Address Light Leakages:
Check for any light leakages in the auditorium and shield them to maintain optimal viewing conditions.
- Seek Expert Guidance:
Before making any adjustments or modifications, seek expert guidance to ensure proper handling.
Common Problems and Troubleshooting Tips:
- Lower Luminance:
Increase the FL level of the projector and perform dusting on the screen to address lower luminance.
- Visible Spots or Marks:
Clean affected areas with a lint-free microfiber cloth. For stubborn stains, use a mild soap and water solution for gentle cleaning.
- Screen Tightness Issues:
If the screen becomes loose or shows signs of shrinkage, check the backside for runners or hooks and replace them with new ones.
- Installation Assistance:
Refer to our installation videos on YouTube and carefully read the installation manuals for proper guidance.
So, taking care of your screen is crucial to ensure its longevity and performance. Your choice of a home theatre projection screen brand plays a big role in the results you desire. In this regard, Lumina Screens is an ideal choice for those who wish to bring cinema to their homes.
FAQ’s
What is Common Screen Sense?
Common Screen Sense is a comprehensive guide by Lumina Screens to help you choose the perfect projection screen based on your unique viewing environment and needs.
How do I choose the right screen for my setup?
Consider factors like room size, lighting conditions, viewing angle, and screen material. Lumina offers tailored solutions to suit both home and professional environments.
Why is screen material so important in choosing the right projector screen?
Screen material affects color accuracy, brightness, and contrast. Lumina offers a variety of materials, including high-gain and ALR options, to meet different lighting conditions.
Can I use Lumina screens in both bright and dark rooms?
Yes, Lumina screens offer different solutions for both bright rooms (with ALR or high-gain materials) and dark rooms (with matte white or neutral screens) for optimal performance.
How does Common Screen Sense help in my selection process?
It simplifies your decision-making by providing expert insights and recommendations tailored to various room setups, ensuring you get the best screen for your needs.
- Date - November 30, 2023